iOS RGBA转YV12

引言

因为项目中要做画面共享,所以需要学一点图像相关的知识,首当其冲就是RGB转YUV了,因为图像处理压缩这一块是由专业对口的同事做的,所以呢,我这就是写一下自己的理解,如有不对的地方,还望指正,谢谢。

正文

知识准备

RGB

三原色光模式RGB color model),又称RGB颜色模型红绿蓝颜色模型,是一种加色模型,将Red)、绿Green)、Blue)三原色的色光以不同的比例相加,以合成产生各种色彩光。

RGB32

RGB32使用32位来表示一个像素,RGB分量各用去8位,剩下的8位用作Alpha通道或者不用。(ARGB32就是带Alpha通道的RGB24。)注意在内存中RGB各分量的排列顺序为:BGRA BGRA BGRA…。通常可以使用RGBQUAD数据结构来操作一个像素,它的定义为:

1
2
3
4
5
6
typedef struct tagRGBQUAD {
BYTE rgbBlue; // 蓝色分量
BYTE rgbGreen; // 绿色分量
BYTE rgbRed; // 红色分量
BYTE rgbReserved; // 保留字节(用作Alpha通道或忽略)
} RGBQUAD。

YUV

YUV,是一种颜色编码方法。常使用在各个影像处理组件中。 YUV在对照片或影片编码时,考虑到人类的感知能力,允许降低色度的带宽。

YUV是编译true-color颜色空间(color space)的种类,Y’UV, YUV, YCbCrYPbPr等专有名词都可以称为YUV,彼此有重叠。“Y”表示明亮度(Luminance、Luma),“U”和“V”则是色度浓度(Chrominance、Chroma)。

YUV Formats分成两个格式:

  • 紧缩格式(packed formats):将Y、U、V值存储成Macro Pixels数组,和RGB的存放方式类似。
  • 平面格式(planar formats):将Y、U、V的三个分量分别存放在不同的矩阵中。

YV12

YV12是每个像素都提取Y,在UV提取时,将图像2 x 2的矩阵,每个矩阵提取一个U和一个V。YV12格式和I420格式的不同处在V平面和U平面的位置不同。在YV12格式中,V平面紧跟在Y平面之后,然后才是U平面(即:YVU);但I420则是相反(即:YUV)。NV12与YV12类似,效果一样,YV12中U和V是连续排列的,而在NV12中,U和V就交错排列的。

排列举例: 2*2图像YYYYVU; 4*4图像YYYYYYYYYYYYYYYYVVVVUUUU。

ps:以上介绍摘自于维基百科、百度百科。

进入正题

获取RGBA数据

在这里主要介绍从Image中获取RGBA数据,会用到CoreGraphics库。

首先我们需要创建bitmap context

1
2
3
4
5
6
7
8
9
10
11
12
13
14
15
16
17
18
19
20
21
22
23
24
25
26
27
28
29
30
31
32
33
34
35
36
37
38
39
40
41
42
43
44
45
46
47
48
+ (CGContextRef) newBitmapRGBA8ContextFromImage:(CGImageRef) image {
CGContextRef context = NULL;
CGColorSpaceRef colorSpace;
uint32_t *bitmapData;

size_t bitsPerPixel = 32; //每一个像素 由4个通道构成(RGBA),每一个通道都是1个byte,4个通道也就是32个bit
size_t bitsPerComponent = 8; //可以理解为每个通道的bit数
size_t bytesPerPixel = bitsPerPixel / bitsPerComponent; //每个像素点的byte大小

size_t width = CGImageGetWidth(image);
size_t height = CGImageGetHeight(image);

size_t bytesPerRow = width * bytesPerPixel; //每一行的字节数
size_t bufferLength = bytesPerRow * height; //整个buffer的size

colorSpace = CGColorSpaceCreateDeviceRGB(); //指定颜色空间为RGB

if(!colorSpace) {
NSLog(@"Error allocating color space RGB\n");
return NULL;
}

// 开辟存储位图的内存
bitmapData = (uint32_t *)malloc(bufferLength);

if(!bitmapData) {
NSLog(@"Error allocating memory for bitmap\n");
CGColorSpaceRelease(colorSpace);
return NULL;
}

// 创建bitmap context
context = CGBitmapContextCreate(bitmapData,
width,
height,
bitsPerComponent,
bytesPerRow,
colorSpace,
kCGImageAlphaPremultipliedLast); // RGBA

if(!context) {
free(bitmapData);
NSLog(@"Bitmap context not created");
}

CGColorSpaceRelease(colorSpace);
return context;
}

接下来需要向image绘制到bitmap context,然后从context中获取bitmap data。代码如下:

1
2
3
4
5
6
7
8
9
10
11
12
13
14
15
16
17
18
19
20
21
22
23
24
25
26
27
28
29
30
31
32
33
34
35
36
37
38
39
40
41
42
43
44
45
+ (unsigned char *) convertUIImageToBitmapRGBA8:(UIImage *) image {

CGImageRef imageRef = image.CGImage;

// 创建bitmap context
CGContextRef context = [self newBitmapRGBA8ContextFromImage:imageRef];

if(!context) {
return NULL;
}

size_t width = CGImageGetWidth(imageRef);
size_t height = CGImageGetHeight(imageRef);

CGRect rect = CGRectMake(0, 0, width, height);

// 将image绘制到bitmap context
CGContextDrawImage(context, rect, imageRef);

// 获取bitmap context 中的数据指针
unsigned char *bitmapData = (unsigned char *)CGBitmapContextGetData(context);

// 拷贝 bitmap text中的数据
size_t bytesPerRow = CGBitmapContextGetBytesPerRow(context);
size_t bufferLength = bytesPerRow * height;

unsigned char *newBitmap = NULL;

if(bitmapData) {
newBitmap = (unsigned char *)malloc(sizeof(unsigned char) * bytesPerRow * height);

if(newBitmap) { // 拷贝数据
memcpy(newBitmap, bitmapData, bufferLength);
}

free(bitmapData);

} else {
NSLog(@"Error getting bitmap pixel data\n");
}

CGContextRelease(context);

return newBitmap;
}

看了这段代码,你可能会有疑问,为什么不直接返回bitmapData呢?这是因为在我们释放bitmap context后,会释放掉bitmapData,所以这就需要我们从新申请空间将数据拷贝到重新开辟的空间了。

格式化图像数据

因为YV12要求以像素的2 * 2矩阵来做转换,所以在做RGB转换YV12之前,我们需要先格式化图像数据,以满足要求。

首先需要格式化图片size,在这里我们以8来对齐,代码如下:

1
2
3
4
5
6
7
8
9
10
11
12
13
14
15
16
17
18
+ (CGSize)fromatImageSizeToYV12Size:(CGSize)originalSize
{
CGSize targetSize = CGSizeMake(originalSize.width, originalSize.height);

//除以8是为了位对齐
int widthRemainder = (int)originalSize.width % 8;

if (widthRemainder != 0) {
targetSize.width -= widthRemainder;
}

int heightRemainder = (int)originalSize.height % 8;
if (heightRemainder != 0) {
targetSize.height -= heightRemainder;
}

return targetSize;
}

在上个步骤我们计算得到了满足YV12格式的size,在这里还需要根据计算到的size来格式化image data,以满足YV12格式要求,代码如下:

1
2
3
4
5
6
7
8
9
10
11
12
13
14
+ (void)formatImageDataToYV12:(unsigned char *)originalData outputData:(unsigned char *)outputData originalWidth:(CGFloat)originalWidth targetSize:(CGSize)targetSize
{
CGFloat targetHeight = targetSize.height;
CGFloat targetWidth = targetSize.width;

unsigned char *pTemp = outputData;

//按照targetSize逐行拷贝数据, 乘以4是因为每个size表示4个通道
for (int i = 0; i < targetHeight; i++) {
memcpy(pTemp, originalData, targetWidth * 4);
originalData += (int)originalWidth * 4;
pTemp += (int)targetWidth * 4;
}
}

数据准备好了,接下来,可以进入真正的主题,RGBA转换为YV12了。

RGBA转YV12

对于RGB转换为对应的YV12,转换规则都是大佬们研究出来的,只是实现的方式各有不同,我在这里罗列了我找到的几种方式。

1
2
3
4
5
6
7
8
9
10
11
12
13
14
15
16
17
18
19
20
21
22
23
void rgb2yuv(int r, int g, int b, int *y, int *u, int *v){
// 1 常规转换标准 - 浮点运算,精度高
*y = 0.29882 * r + 0.58681 * g + 0.114363 * b;
*u = -0.172485 * r - 0.338718 * g + 0.511207 * b;
*v = 0.51155 * r - 0.42811 * g - 0.08343 * b;

// 2 常规转换标准 通过位移来避免浮点运算,精度低
*y = ( 76 * r + 150 * g + 29 * b)>>8;
*u = (-44 * r - 87 * g + 131 * b)>>8;
*v = ( 131 * r - 110 * g - 21 * b)>>8;
// 3 常规转换标准 通过位移来避免乘法运算,精度低
*y = ( (r<<6) + (r<<3) + (r<<2) + (g<<7) + (g<<4) + (g<<2) + (g<<1) + (b<<4) + (b<<3) + (b<<2) + b)>>8;
*u = (-(r<<5) - (r<<3) - (r<<2) - (g<<6) - (g<<4) - (g<<2) - (g<<1) - g + (b<<7) + (b<<1) + b)>>8;
*v = ((r<<7) + (r<<1) + r - (g<<6) - (g<<5) - (g<<3) - (g<<2) - (g<<1) - (b<<4) - (b<<2) - b)>>8;

// 4 高清电视标准:BT.709 常规方法:浮点运算,精度高
*y = 0.2126 * r + 0.7152 * g + 0.0722 * b;
*u = -0.09991 * r - 0.33609 * g + 0.436 * b;
*v = 0.615 * r - 0.55861 * g - 0.05639 * b;

*v += 128;
*u += 128;
}

以上的转换方式都是可行的,当然要提升效率的话,还有查表法什么的,这些有兴趣的可以自行搜索。既然转换规则固定了,那么不考虑效率的前提下,我们需要做的就是如何从rgba数组中按照2 * 2矩阵来获取YUV数据并存储下来了。

在这里介绍采用紧缩格式存储YV12的数据。为了便于理解,在这里先举个栗子:

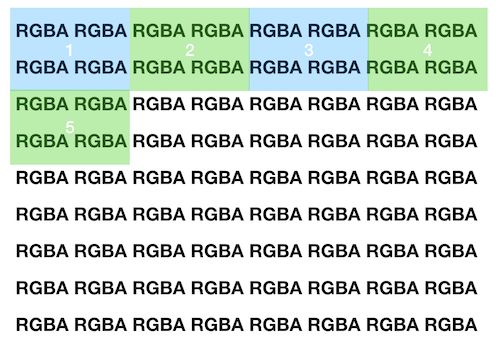
下图中的表示一张图中的像素排列,每个像素都包含RGBA通道,将RGBA转换为YV12需要按照2 * 2的像素矩阵为单位来处理,在图中就是按颜色分块中的像素来获取YUV数据,YV12是每4个像素获取一次U、V分量的数据,每个像素都要获取Y分量。

要看转换后的YUV的样子,这里以2 * 2为例,8 个像素生成的YUV如下:

1
YYYY YYYY VV UU

有了上面的知识,就可以直接上代码看看了。在这里我们以数组的方式来存储yuv数据,输入的rgba数据我们设置为int型数组,因为每个像素包含4个通道,每个通道都是一个byte,这样每个像素是4个byte,正好是一个int。需要注意的是,在int数组中,按理说每个int的数据应该是:RGBA,但是在iOS上,由于iOS是小端,所以实际上每个int的内容为ABGR,所以在取数据的时候需要注意,避免弄错顺序。还有需要注意的是,计算出来的UV数据需要避免负数,不然颜色值会有问题。

1
2
3
4
5
6
7
8
9
10
11
12
13
14
15
16
17
18
19
20
21
22
23
24
25
26
27
28
29
30
31
32
33
34
35
36
void rgbaConvert2YV12(int *rgbData, uint8_t *yuv, int width, int height) {
int frameSize = width * height;
int yIndex = 0;
int vIndex = frameSize;
int uIndex = frameSize * 1.25;

int R, G, B, Y, U, V, A;
int index = 0;
for (int j = 0; j < height; j++) {
for (int i = 0; i < width; i++) {//RGBA
//样式为ABGR iOS设备为小端
A = (rgbData[index] >> 24) & 0xff;
B = (rgbData[index] >> 16) & 0xff;
G = (rgbData[index] >> 8) & 0xff;
R = rgbData[index] & 0xff;

//转换
rgb2yuv(R, G, B, &Y, &U, &V);
//避免负数
U += 128;
V += 128;

Y = RANG_CONTROL(Y, 0, 255);
U = RANG_CONTROL(U, 0, 255);
V = RANG_CONTROL(V, 0, 255);

yuv[yIndex++] = Y;

if (j % 2 == 0 && i % 2 == 0) {//按2 * 2矩阵取
yuv[vIndex++] = V;
yuv[uIndex++] = U;
}
index ++;
}
}
}

YV12转RGBA

首先还是yuv转rgb的方法,这与RGB转YV12是对应的。

1
2
3
4
5
6
7
8
9
10
11
12
13
14
15
16
17
18
19
20
21
void yuv2rgb(int y, int u, int v, int *r, int *g, int *b){
u -= 128;
v -= 128;
// 1 常规转换标准 - 浮点运算,精度高
*r = y + (1.370705 * v);
*g = y - (0.337633 * u) - (0.698001 * v);
*b = y + (1.732446 * u);

// 2 常规转换标准 通过位移来避免浮点运算,精度低
*r = ((256 * y + (351 * v))>>8);
*g = ((256 * y - (86 * u) - (179 * v))>>8);
*b = ((256 * y + (444 * u)) >>8);
// 3 常规转换标准 通过位移来避免乘法运算,精度低
*r = (((y<<8) + (v<<8) + (v<<6) + (v<<4) + (v<<3) + (v<<2) + (v<<1) + v) >> 8);
*g = (((y<<8) - (u<<6) - (u<<4) - (u<<2) - (u<<1) - (v<<7) - (v<<5) - (v<<4) - (v<<1) - v) >> 8);
*b = (((y<<8) + (u<<8) + (u<<7) + (u<<5) + (u<<4) + (u<<3) + (u<<2)) >> 8);
// 4 高清电视标准:BT.709 常规方法:浮点运算,精度高
*r = (y + 1.28033 * v);
*g = (y - 0.21482 * u - 0.38059 * v);
*b = (y + 2.12798 * u);
}

重点来了,将YUV数组恢复为RGBA数组

1
2
3
4
5
6
7
8
9
10
11
12
13
14
15
16
17
18
19
20
21
22
23
24
25
26
27
28
29
30
void YV12Convert2RGB(uint8_t *yuv, uint8_t *rgb, int width, int height){
int frameSize = width * height;
int rgbIndex = 0;
int yIndex = 0;
int uvOffset = 0;
int vIndex = frameSize;
int uIndex = frameSize * 1.25;
int R, G, B, Y, U, V;

for (int i = 0; i < height; i++) {
for (int j = 0; j < width; j++) {
Y = yuv[yIndex++];
uvOffset = i / 2 * width / 2 + j / 2;//按2 * 2矩阵 还原

V = yuv[vIndex + uvOffset];
U = yuv[uIndex + uvOffset];

yuv2rgb(Y, U, V, &R, &G, &B);

R = RANG_CONTROL(R, 0, 255);
G = RANG_CONTROL(G, 0, 255);
B = RANG_CONTROL(B, 0, 255);

rgb[rgbIndex++] = R;
rgb[rgbIndex++] = G;
rgb[rgbIndex++] = B;
rgb[rgbIndex++] = 255;
}
}
}

以上就是iOS中RGB与YUV互转的方式了,你可以在这里下载demo

参考

三元光模式-维基百科

RGB百度百科

IOS rgb yuv 转换

YUV和RGB互相转换及OpenGL显示YUV数据

YUV颜色编码解析

YUV与RGB格式转化